Mobile Hybrid Application: Ionic Framework vs. Onsen UI

The Question

I’ve recently started developing mobile hybrid applications (meaning HTML+JS+CSS web applications compiled into a native mobile app) and after researching for a bit, I’ve gotten a hang of the process and learnt a few tips and tricks along the way to be able to quickly ramp up a mobile app within hours.

Ionic and Onsen are two popular UI frameworks that provide a feature set to assist you in building common UI elements such as lists, forms, checkboxes, etc…

In this post I want to give my own experience of using the two in a technical format and some things I’ve discovered. If there are specific topics you want me to go through please feel free to comment below.

Ionic Framework

I started with this framework after a bit of research.

  • Predefined starter templates are available. There are also command line options to customize your mobile app,  but I think in general they’re mostly handy wrappers for existing Cordova commands.
  • The framework offers clean user interface elements that mobile developers can use to quickly layout simple informational hybrid apps. However, from an aesthetics point of view I’d personally slightly prefer Onsen UI, but others might disagree. (More on this in the Onsen UI section)
  • The documentations are excellent as it covers a lot of the basics and the support forums are far richer than Onsen UI that dwells deeper into more complex scenarios such as mapping, gestures, customization etc..
  • it does have it’s fair share of “bugginess” due to it’s nature of trying to wrap itself around AngularJs and force you to use it’s directives for it’s functionalities. Although most of these issues I’ve encountered has been encountered before by fellow developers in the forum section.
  • Further to that point, it seems to assume your app will be structured in a hierarchical fashion where you’d define an outer shell, and inside that shell you’d have a toolbars shell, and each button would load an inner page. While this works for simple apps, you might stumble into issues when dealing with maps, for example.
  • Probably because of that, I felt that Onsen UI performs slightly faster than Ionic in terms of app/page loading and navigation animations between pages.

Onsen UI

In my second attempt I tried out Onsen UI. I was first attracted to it due to purely aesthetics.

  • Similar to Ionic, Onsen provides several starter templates called Page Patterns for you to copy and paste into your project. I actually find this easier to work with than Ionic as I only need to copy the pages that I need, whereas with Ionic you’d be expected to download a “starter package” and then delete the items that you don’t need.
  • Onsen is also not a big overhead over Cordova as Ionic because Ionic tries to overlap a whole framework of page loading onto Cordova.
  • If you’re familiar with JQuery Theme Roller, there is a similar tool Onsen Theme Roller for you to customize your theme. They’re beautifully designed that in most cases you only need to select your color theme for your project and you’re ready to go.
  • The documentation also covers mostly the basics but you might find support to be lacking as this hasn’t been around for as long as Ionic. Also sometimes if you google for specific issues you might find resources in Japanese as this project was originally based from Japanese developers. Having said that, I find the support for Cordova to be quite relevant for Onsen as well in most cases as Onsen don’t add that much logic over top of Cordova.
  • As mentioned on top, the performance feels more fluid and more like a native app when developing with Onsen UI.
  • It probably doesn’t have as many user controls as Ionic, but on the other hand I find it’s less cluttered and the resulting design would probably be more elegant as it’s confined to a standard. Some with little design skill as me might find this an advantage.

The Verdict

As you can guess, I’m more in favor of Onsen due to it’s simplicity and overall it’s readily useful for the design-challenged developer.

If you’ve got any questions or comments about using each feel free to leave comments below.
Convert CSV to DataTable

The Problem

This is going to be a short post about transform a CSV text string into a DataTable.

The Options

Surprising, a lot of search results suggest code that uses the String.Split Method for “parsing”. While this works if all your data are numbers, it’ll fail miserably if you have quotes and/or commas in your data. So using a third-party library is probably the best for this kind of grunt work job. (Unless you have specific requirements not to otherwise)

The library I used was called A Fast CSV Reader from CodeProject.

Quite simply, it involves loading the library with the csv string, creating the header (if you have one) and then going through each cell to put the data into a the corresponding rows.

The Code

private static DataTable ConvertCsvToDataTable(string csv)
{
    CsvReader reader = new CsvReader(new StringReader(csv), true);
    DataTable dt = new DataTable();

    // Parse header information from first row
    string[] headers = reader.GetFieldHeaders();
    foreach (string header in headers)
        dt.Columns.Add(header);

    // Parse data into each cell of the datatable
    int fieldCount = reader.FieldCount;
    while (reader.ReadNextRecord())
    {
        DataRow row = dt.NewRow();
        for (int i = 0; i < fieldCount; i++)
            row[i] = reader[i];
        dt.Rows.Add(row);
    }

    return dt;
}
Tagged ,

Creating a Module in DotNetNuke (The 2012 Way!)

The Problem

I’ve been working with DotNetNuke for half a year now and so far (shamefully) I still don’t know the proper steps in building a DotNetNuke Module. So I understand a module is basically an ASP.NET UserControl (*.ascx), but what next? And how do I “use” it like a module in DotNetNuke?

The Options

So it seems the “traditional” (or pre-2012) way of creating a DotNetNuke module involves downloading the DotNetNuke module template, installing it, creating a Visual Studio Project, package the module and then install it in your DotNetNuke instance.

Sounds like a lot of work.

The Steps

The other way I found (that in theory don’t require Visual Studio) are:

  1. Goto the Host > Extensions.
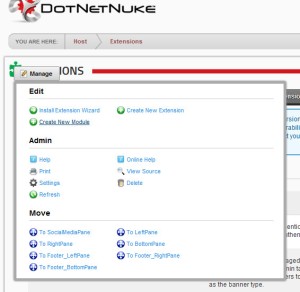
  2. Goto Create New Module from the Managedropdown.

    Create New Module

    Create New Module

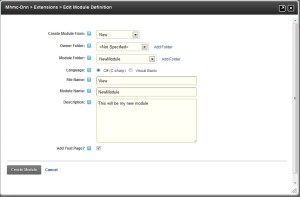
  3. In the popup window, Select New from the Create Module From dropdown and fill in some details about your new module and be sure to Add Test Page so you can see how your new module looks.

    Edit Module Definition

    Edit Module Definition

  4. Click Create Module and you’re done!

Now you should see your new module directory in the /DesktopModules folder of your DotNetNuke installation. And if you followed my module definition you will find the User Control file in /DesktopModules/NewModule/View.ascx.

You can start writing your ASP.NET code from there or create a code-behind file as you like for your User Control with your favourite editor.

Tagged

A Generic Data Access Class for Entity Framework (3.5) in a Disconnected N-Tier Architecture

The Problem

The entity framework provides a ORM mapper for generating business entities from database tables and relationships. For this post I wanted to create a generic wrapper around the generated entities so that the returned objects can be used in a stateless fashion such as a Web Application or even a remote Web Service.

I wanted the generic wrapper to make use of the entities to expose a single method for each of SELECT, UPDATE, INSERT and DELETE and to take the entity as an input parameter.

The Code

BaseModel.cs

    public abstract class BaseModel<TEntity> where TEntity : EntityObject
    {
        public static string EntityName = typeof(TEntity).Name;

        public static ObjectQuery<TEntity> CreateQuery()
        {
            Entities context = new Entities();            
            ObjectQuery<TEntity> query = context.CreateQuery<TEntity>(EntityName);
            query.MergeOption = MergeOption.NoTracking;
            return query;
        }
    }

The BaseModel class is an abstract class that can be used as-is or be derived into a data class for one of the entities. It uses a generic TEntity parameter so the CRUD methods only needs to be implemented once. The CreateQuery() function uses MergeOption.NoTracking to separate the returned objects from the context so that they can be used independently.

        public static List<TEntity> Select()
        {
            ObjectQuery<TEntity> query = CreateQuery();
            using (ObjectContext context = query.Context)
            {                
                List<TEntity> result = query.ToList();
                return result;
            }
        }

        public static List<TEntity> Select(Expression<Func<TEntity, bool>> predicate)
        {
            ObjectQuery<TEntity> query = CreateQuery();
            using (ObjectContext context = query.Context)
            {
                List<TEntity> result = query.Where(predicate).ToList();
                return result;
            }
        }

There are two versions of Select() to either select all the records from the database or select using a filter predicate.

        public static int Update(TEntity entity)
        {
            using (Entities context = new Entities())
            {
                context.Attach(entity);
                ObjectStateEntry state = context.ObjectStateManager.GetObjectStateEntry(entity);
                CurrentValueRecord record = state.CurrentValues;
                for (int i = 0; i < record.FieldCount; i++)
                {
                    bool isKey = false;
                    string name = record.GetName(i);
                    foreach (EntityKeyMember keyMember in state.EntityKey.EntityKeyValues)
                        if (keyMember.Key == name)
                            isKey = true;
                    if (!isKey)
                        state.SetModifiedProperty(record.GetName(i));
                }
                int result = context.SaveChanges();
                return result;
            }
        }

Because the entity was not tracked by the context, we need to force the object to be modified before saving it into the database. In this case we’re using a brute method of looping through all the properties (except EntityKey) and setting the Modified property.

        public static int Insert(TEntity entity)
        {
            using (Entities context = new Entities())
            {
                context.AddObject(EntityName, entity);
                int result = context.SaveChanges();
                return result;
            }
        }

        public static int Delete(TEntity entity)
        {
            using (Entities context = new Entities())
            {
                context.Attach(entity);
                context.DeleteObject(entity);
                return context.SaveChanges();
            }
        }
    }

The insert and delete methods are simply attaching or deleting the object before saving the changes to the database.

Tagged , ,

Building a Slider to Transform and Save Data in ASP.Net

There are many Slider control solutions available that provides pretty much the same functionality: manipulate numeric data with a graphical slider, and display that number in an HTML tag.

The Problem

So I premise is that I want to make one that work on top of ASP.Net which attaches JavaScript to a WebControl so it’s implementation is completely hidden from the ASP.Net programmer. The end result should display a slider with a formatted value that’s displayed next to the slider. In this sample, I want the user to drag the slider to select the measurement and compute the value in both centimetre and inch unit as the user moves the slider.

The Options

  1. The ASP.Net AJAX Control Toolkit provides a painless way to install and drag a Slider control on a ASP.Net WebForm in Visual Studio. However, the controls are difficult to style and is closely tied to server-side code.
  2. The JQuery UI provides the Slider control. The code implementation and style themes are fairly basic and is covered in their website. From the client-side script, JQuery handles the slide event to set the display value and also the ASP.Net control at the same time. The server-side code retrieves the value like a regular ASP.Net control from the code-behind.

The Code

Default.aspx

<link type="text/css" href="Css/theme/jquery-ui-1.8.19.custom.css" rel="Stylesheet" /> 
<script type="text/javascript" src="js/jquery-1.7.2.min.js"></script>
<script type="text/javascript" src="js/jquery-ui-1.8.19.custom.min.js"></script>
<div id="Slider"></div>
<div id="SliderValue"></div>
<script type="text/javascript">
  var Length = $("#<%=Length.ClientID%>");
  $(function () {
    $("#Slider").slider({
      range: "min",
      min: 0,
      max: 300,
      animate: true,
      value: 0,
      slide: function (event, ui) {
        Length.val(ui.value);
        convertLength();
      }
    });
    Length.hide();
  });
  function convertLength() {
    if (Length.val() > 0) {
      var feet = Math.round(ui.value * 0.032808399 * 10) / 10;
      $("#SliderValue").text(ui.value + " cm / " + feet + " ft");
    }
  }
</script>

Default.aspx.cs

int LengthCm = Int32.Parse(this.Length.Text);
Tagged , , ,

Dynamic Tabs in Masterpage Based on Current Page in ASP.NET

There are probably better options for laying out templates besides the ASP.Net Masterpage that offers greater flexibility and usability. None the less, Masterpage is still a handy option to use in ASP.Net development due to its integrated support with Visual Studio IDE.

The Problem

One thing that is not provided out of the box is an easy way to create menus that can alter its appearances based on the current page. For example, if I’ve got a menu with Home tab, About Me tab, and a Contact Me tab, I’d want the About Me tab to light up when I’m on the About.aspx and any other pages under the About Me section.

The Options

There’s basically two ways to approach this problem:

  1. Create some kind of variable in the Masterpage to indicate the tab to highlight and have the Contentpage set the variable to indicate which tab it wants to be lighten up. This is a workable solution but it involves the Contentpage having knowlege of the Masterpage variable and so introduces tighter coupling.
  2. The other way is to control everything from the Masterpage which is what I’ve shown here. The thing that needs to be done here is to keep some kind of Map of which pages triggers which menu highlight.

The Code

Site.Master

<%@ Import Namespace="System.Collections.Generic" %>
<script runat="server">
    private static SortedDictionary<string, string> TabPages =
        new SortedDictionary<string, string>()
            {
                {"Home.aspx","Home"},
                {"About.aspx","About"},
                {"Organization.aspx","About"},
                {"Contact.aspx","Contact"},
            };
    private string SetTab(string tabName)
    {
        string currPage = System.IO.Path.GetFileName(Request.FilePath);
        string currTab = "";
        TabPages.TryGetValue(currPage, out currTab);
        return currTab == tabName ? "current" : "";
    }
</script>

<link rel="stylesheet" type="text/css" href="StyleSheet.css" />

<ul id="Menu">
    <li class="<%=SetTab("Home")%>"><a href="Home.aspx">Home</a></li>
    <li class="<%=SetTab("About")%>"><a href="About.aspx">Survey</a></li>
    <li class="<%=SetTab("Contact")%>"><a href="Contact.aspx">Contact Us</a></li>
</ul>

StyleSheet.css

ul#Menu li.current
{
    background-color: #eee;
}
Tagged ,

Reading an Excel 2007 (*.xlsx) into a DataTable Without Installing Office

The Problem

I wanted an easy way to import data from an Excel file into a DataTable that can be manipulated and displayed in a User Control. It seems there is no “good” internal support of dealing with Excel files within the .Net Framework (the current version being .Net 4.0). So below outlines the journey I took to finally arrive at the end solution that is efficient and fast, without writing mass amount of code.

The Options

  1. Microsoft Jet OleDB – While this used to be the method of choice for connecting to Microsoft products of the past, it is not a viable solution any more because it is not supported in 64-bit Windows operating system. Although there is a workaround to run the application in 32-bit environment, it is not a preferable choice.
  2. Microsoft Ace OleDB – This is the successor of the Jet engine and it is released to support 64-bit. However, it is an additional driver that has to be installed on the server to support Microsoft Office products.

Then I went to look at third part products that can help me do the job. And I came across the keyword “Open Xml File Format”, which is essentially the “new” format used by Microsoft for any 2007 and later products in the Office Suite. In particular, they have file extensions ending in “x” denoting “XML” (ie: docx, xslx). So I Googled some more information in that general direction and finally found some light in programming this new format.

  1. Microsoft has a lengthy article / documentation on “Retrieving Excel 2007 Cell Values“; I never got to the end of that because it sounds like there’s a lot of grunt work involved plus I need to create the schema for it which seems like a lot of work.
  2. NPOI – This is a open source package that allows you to read “XLS” files (Excel files prior to 2007). I tried it. It’s fast, easy to program against, but it won’t open Excel 2007 files. At the moment of writing, the developer  of this package is planning to release future versions that incorporate reading the newer Open XML File Format.
  3. Excel Package – Now this is the first package so far that does what I want in a way that involves less than 20 lines of code. It works as long as you also get the ExcelWorkSheetDimension class (sorry I forgot where the link is)  to get the size of the WorkSheet. I won’t post my sample here but there are samples available on the CodePlex repository. The only problem is reading (and writing) from the Excel file is really slow; I had an Excel sheet of maybe a thousand cells and it took 7 seconds to load it. While this maybe acceptable for some, I believe it can be improved.
  4. EPPlus – This is the final package I adopted which works for Excel 2007, operate in 64-bit, don’t need to install extra Office products, and ran the import operation in less than a second. This package is currently being constantly maintained and is already full of features. Here’s the snippet of code to grab the Excel 2007 data into a Datatable using EPPlus.

The Code

using System;
using System.Data;
using System.IO;
using OfficeOpenXml;

public static DataTable ImportToDataTable(string FilePath, string SheetName)
{
	DataTable dt = new DataTable();
	FileInfo fi = new FileInfo(FilePath);

	// Check if the file exists
	if (!fi.Exists)
		throw new Exception("File " + FilePath + " Does Not Exists");

	using (ExcelPackage xlPackage = new ExcelPackage(fi))
	{
		// get the first worksheet in the workbook
		ExcelWorksheet worksheet = xlPackage.Workbook.Worksheets[SheetName];

		// Fetch the WorkSheet size
		ExcelCellAddress startCell = worksheet.Dimension.Start;
		ExcelCellAddress endCell = worksheet.Dimension.End;

		// create all the needed DataColumn
		for (int col = startCell.Column; col <= endCell.Column; col++)
			dt.Columns.Add(col.ToString());

		// place all the data into DataTable
		for (int row = startCell.Row; row <= endCell.Row; row++)
		{
			DataRow dr = dt.NewRow();
			int x = 0;
			for (int col = startCell.Column; col <= endCell.Column; col++)
			{
				dr[x++] = worksheet.Cells[row, col].Value;
			}
			dt.Rows.Add(dr);
		}
	}
	return dt;
}
Tagged ,